- Published on
Architecting Advanced Looping & Branching with OmniStudio
- Authors

- Name
- Emily McCowan
- @heyemilyhay

Introduction
One of the questions I hear all the time from my fellow Salesforce architects and our functional developers is: “when should I use an OmniScript vs a Screen Flow?”. Salesforce has published comparisons of the two and some advice on when to select each declarative option (snapshot is shared below). My opinion so far has been that overall, for a better user experience, you should opt for OmniScripts; for better handling advanced processes with loops and really complex branches, opt for a Screen Flow.

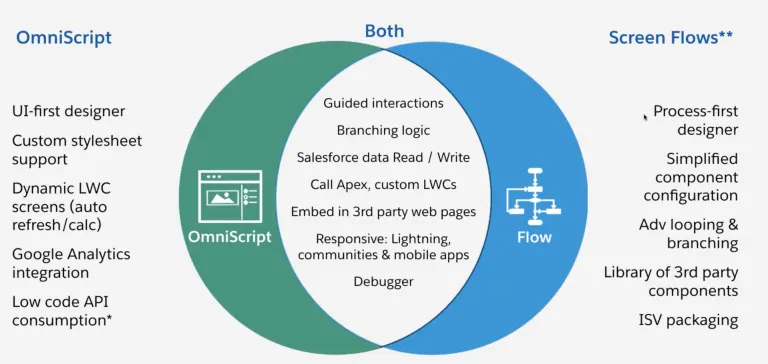

Comparing OmniScript to Screen Flows
That’s a bit of a problem, if you are looking to implement declarative forms with some actually quite lovely OOTB (and configurable) UI elements, but you’re hamstrung by complex business processes. Which enterprise doesn’t have complex business processes? This led me to think about the OmniStudio capabilities beyond OmniScripts. Is there a way to build a form with a loop-like experience, without depending on code, and without leveraging Flow?
Well, with some experimenting I’ve proven there is, read on for some tips on how I achieved this.
The Process
Here’s a made up scenario: a local government council, let’s call them Metropoburg City Council, wants to digitise their handles pet licence application forms, as part of an overall transformation providing digital self-service to constituents. They’ve got their hands on OmniStudio from Salesforce; they’ve already mapped out their application process and are asking you for help building it.

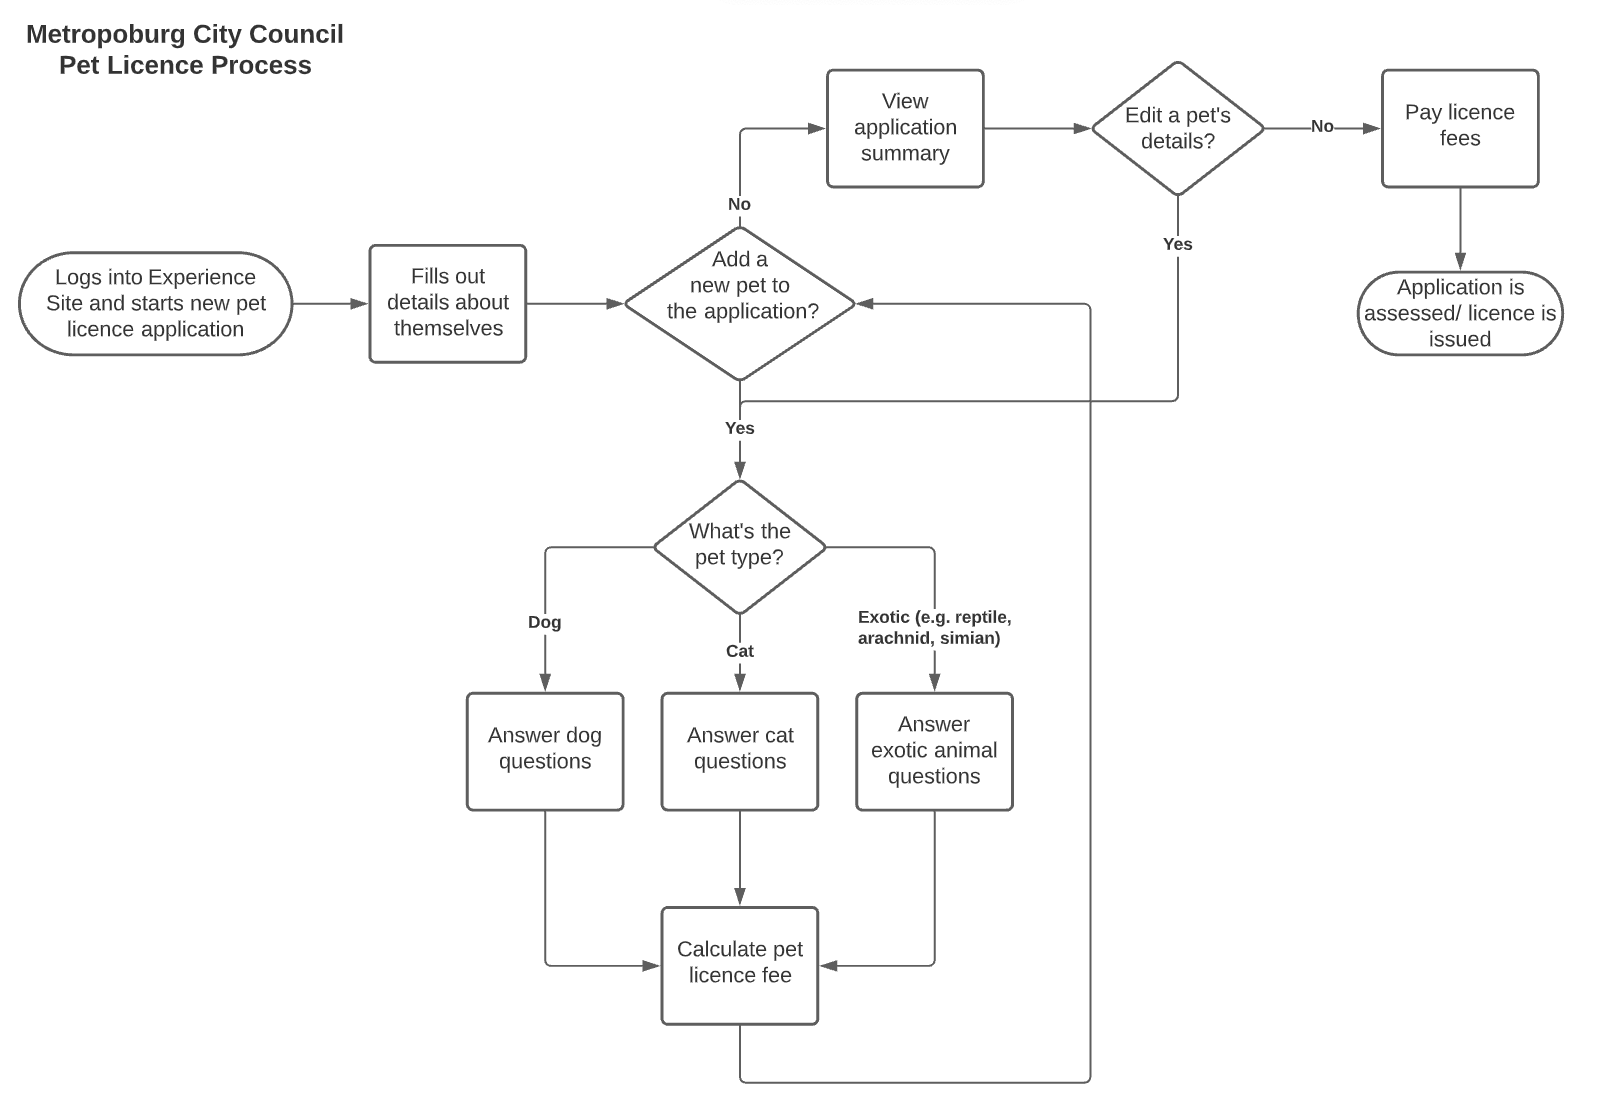
Metropoburg City Council's Pet Licence Process
We have a few things going on in this process - it’s not wildly complex, but it does require a closer look.
- Firstly; we’re expecting the constituent to be authenticated to an Experience Site. Good, that means we’ll have some information about the person who is applying for the pet licence(s).
- We ask them to fill out some information - perhaps this can be pre-filled. Bread-and-butter OmniScript stuff so far.
- Decision 1: Do you want to add a new pet to the application? We can assume this will happen at least once. Here’s our loop.
- Decision 2: What type of pet is it? Looks like we have a branching scenario here. This could be fairly simple; or, it could be a full-blown, complex & lengthy series of steps for each pet type. Let’s imagine it’s really complex to make the scenario worth it!
- OK, now that we’ve provided details about the pet, the system will calculate the licence fee. Let’s assume this is very basic - we can look deeper into complex calculations another time :)
- Then we come back to Decision 1. So we could loop through the above steps a bunch of times, cool.
- When we’re done adding pets, we come to a review step. We can see the summary of our application.
- Decision 3: Do we want to go back and edit the details about a particular pet? This is basically saying, I want to go back into my loop for Decision 1, but I want to be in edit mode not adding an entirely new pet.
- And finally we pay our licence fees and away we go.
Basically - you couldn’t build this application form process with a single OmniScript. I’m going to solve this using 4 OmniScripts and 2 FlexCards.
Component 1: The "Main" OmniScript
Any good application form built in OmniStudio needs an OmniScript. (I have seen evidence that we might get simple input fields for FlexCards really soon - but they would be just that, simple.) Let’s start with an OmniScript to make the most of all those wonderful interactive UI elements.
This “Main” OmniScript will be where we hold the overall structure of the process. We’ll include 4 steps
- Collect / update the applicant details
- A loop to navigate out to add multiple new pets to the application
- A review page, where the applicant can go back and edit each individual pet if they’ve made a mistake
- A submit and pay page, where the application will be paid and submitted for approval.
In Step 1 - Applicant Details, we can pre-populate and collect updates to data about the applicant themselves. Given the constituent already logged into our Experience Site, we know who they are so that’s easy done.

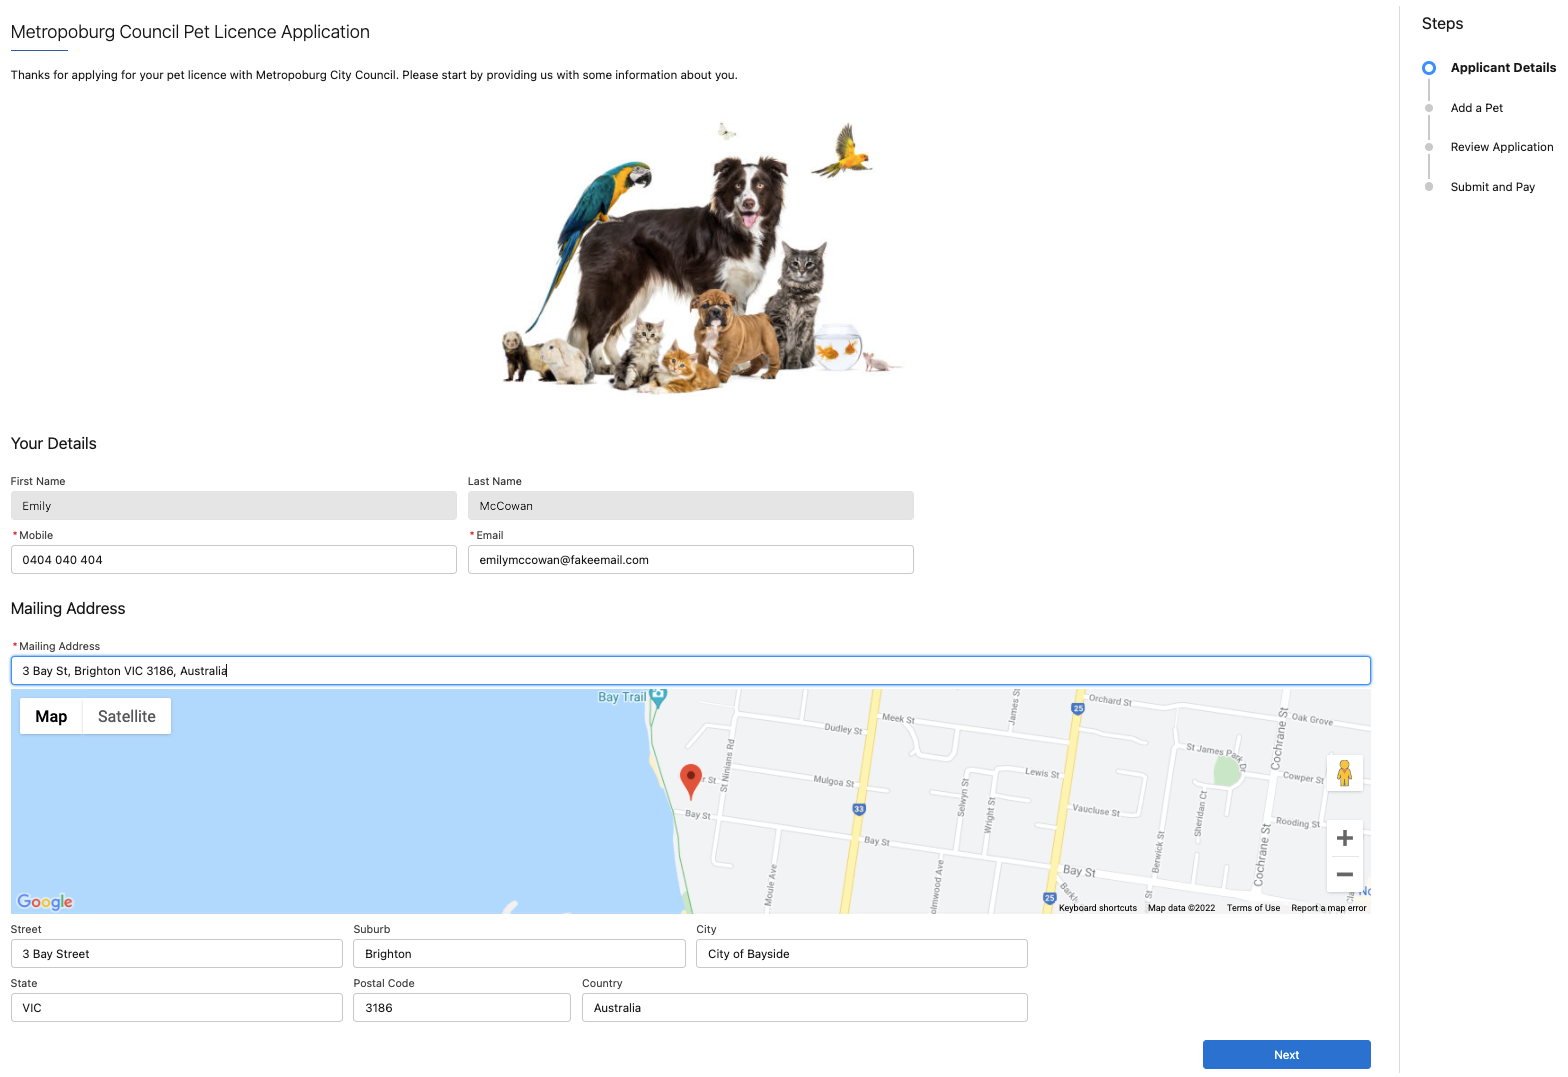
Step 1 - Applicant Details
And then, in Step 2, Add a Pet - this is where we commence our loop. The constituent can add their first pet, by way of an action (Flyout) that opens the corresponding OmniScript (see Component 3: The “Child” OmniScripts). When they are finished adding that pet, we’ll return them to the same original OmniScript page. They can click the action to add a new pet as many times as they like.
Step 2 consists of 2 separate FlexCards embedded in the OmniScript, described in more detail in the next section.
Component 2: The FlexCards
Your constituent firstly needs to be able to open Component 3: The “Child” Omniscripts in a modal - so we need a FlexCard to achieve this, because Flyouts are not possible from OmniScripts at this time. We only want to show these Flyout actions once, at the top of the page.
Your constituent should be able to see a summary of the pets they’ve added so far, so they don’t add Fido twice. It’d be good to be able to edit the previously entered pet’s licence details, and perhaps remove them from the application altogether if our constituent has made a mistake.
OmniStudio has a few options for displaying tables of data, with their own respective considerations. There’s a whole article worth of content just on its own, in regards to selecting the right table option for your particular use case. In our use case, we:
- have an unknown number of pets to display
- require per-row actions
- want to maximise our control over the styling of the data table.
- are proving out a no-code solution here, so no custom LWCs please!
- don’t expect a huge number of rows, so sort/search are not requirements for us
- need to handle complex sub-processes so in-line editing won’t be appropriate.
This makes a FlexCard with an array data source our best option. Why not add this to the FlexCard with the Flyout actions to add a new pet? We can have an unknown number of pets, we need this FlexCard to repeat itself once for each record returned in our query; this is why we need two separate FlexCards, because we don’t want to repeat the Add New Pet Flyouts down the page.

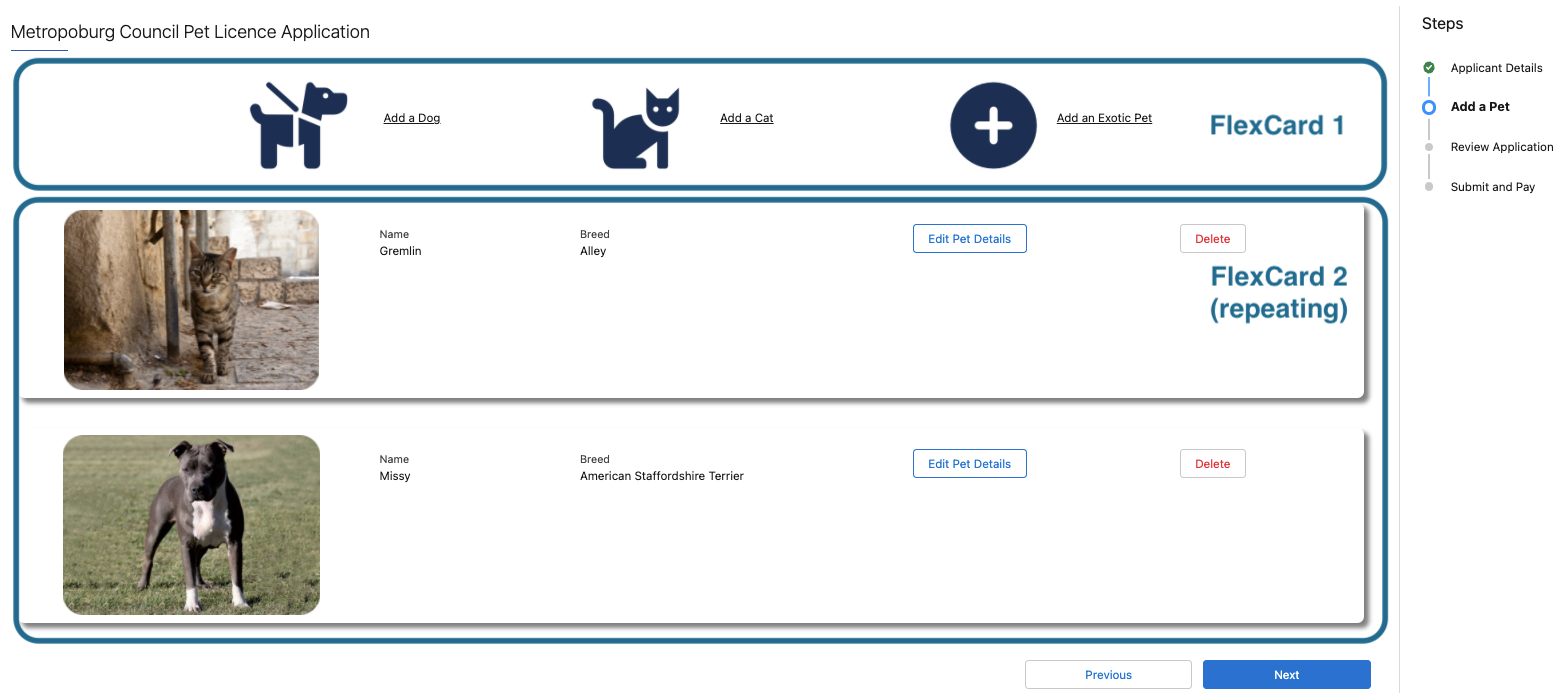
Flexcards 1 and 2 in Step 2 - Add a Pet. The first FlexCard only shows once, and the second repeats down the page as we have set the data source as the array of child Pets already added to this Pet Licence Application.
Component 3: The "Child" OmniScript
We need 3 OmniScripts for this step of our scenario because we are mocking up a scenario where we need to loop out with complex branching. We’ll create a separate OmniScript to be used for each of the FlyOuts we built in FlexCard 1, above - 1 for Dog Licence details, 1 for Cat Licence details, and 1 for all of the other exotic pets you might need to licence here in Australia, like your friendly pet python.
I’m calling them “Child” OmniScripts because we’ll call them as a sub-process within our Main OmniScript - but these will be standalone OmniScripts. They’re not reusable and embedded in the Main OmniScript, because that would restrict our ability to loop back to our starting point on Step 2 when we’ve finished adding one pet and are ready to add another.
The OmniScript needs to save the new pet record to the Application, so we’ll pass the ApplicationId via a FlyOut attribute to become the ContextId of the OmniScript.

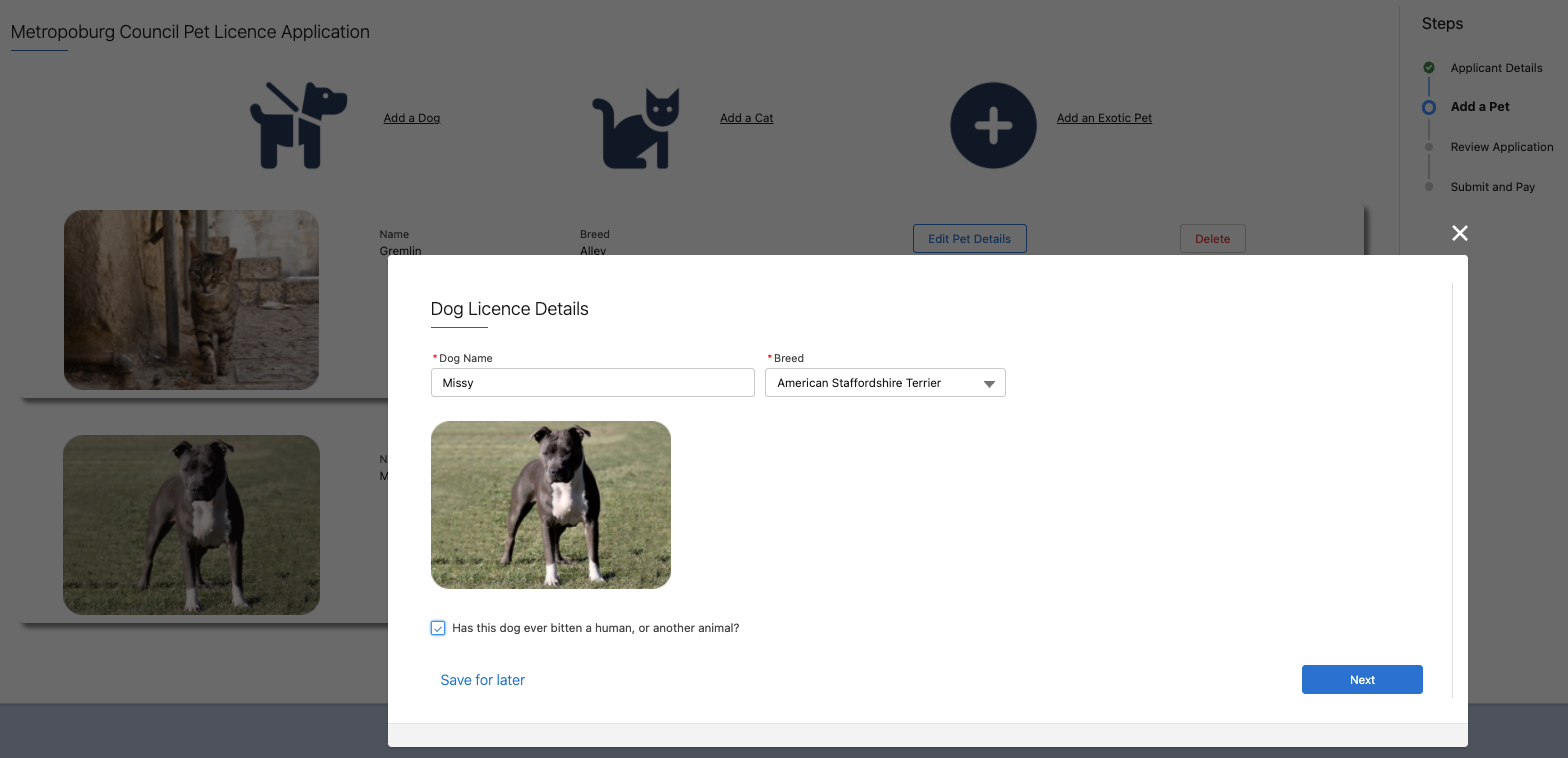
FlyOut to a "Child" OmniScript - Step 1

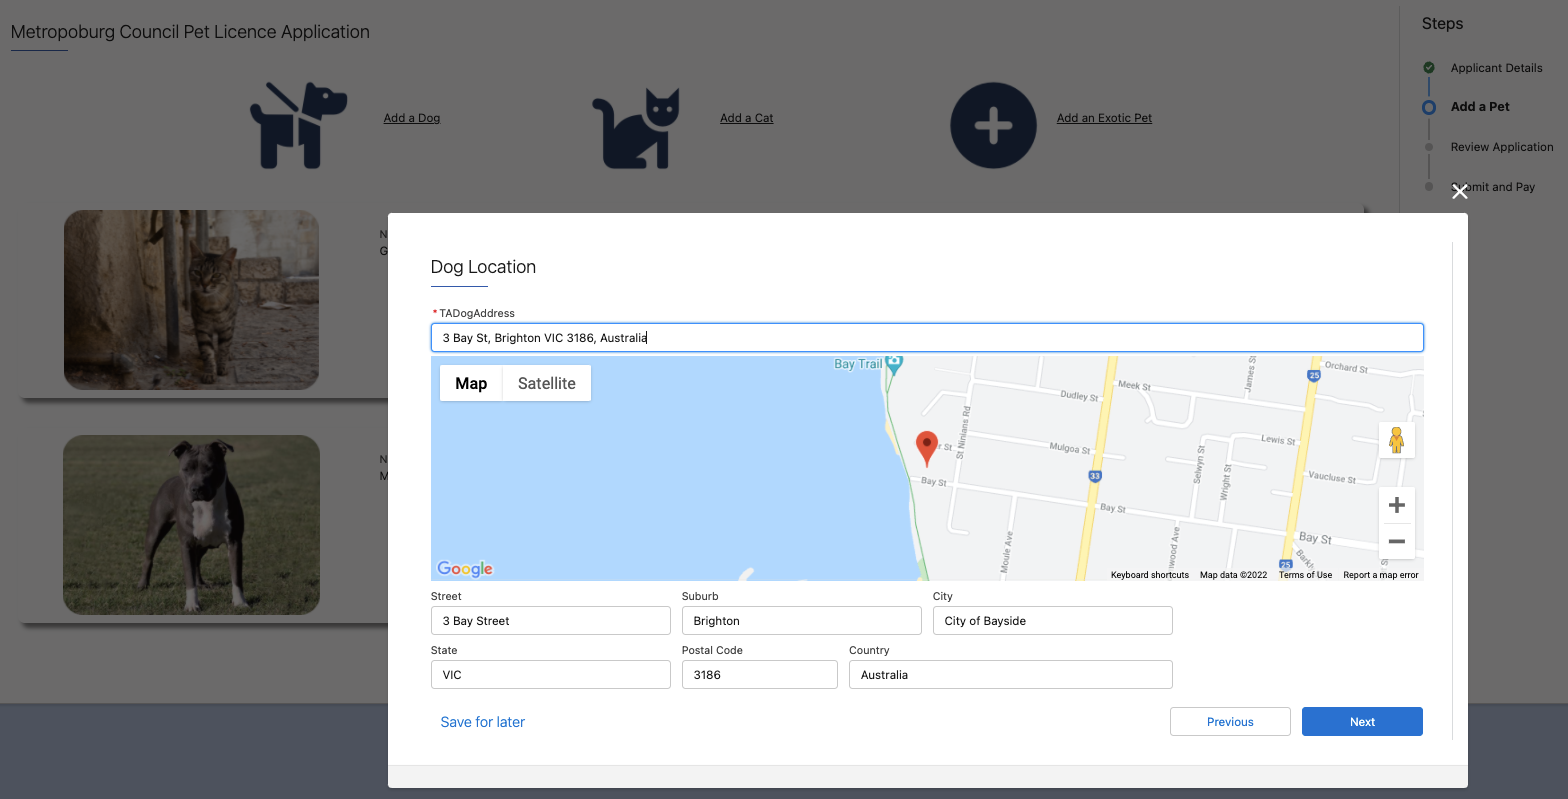
FlyOut to a "Child" OmniScript - Step 2
When the OmniScript we called in our FlyOut is complete, and the modal is closed, we can return to the Main Omniscript - Step 2, and proceed to add more pets or carry on to review, then submit and pay for our application.
Summary
So there you have it! Looping and branching logic, 100% configurable, no code required, using all OmniStudio features. This was a fairly straightforward example I’ve used to prove out the concept but you could feasibly end up with a main OmniScript that embedded multiple loops and branching logic for each step along the way. For instance, if you needed to loop for more than one set of child data for the application.
I’ll share links to some of the resources I’ve used in building this example if you want to play around with this concept yourself. If you have any questions, you can find me on Twitter @heyemilyhay.
Resources
OmniStudio Foundation document (links to PDF): https://developer.salesforce.com/files/credential-resources/OmniStudio-Documentation.pdf
OmniStudio dev org signup link: https://trailhead.salesforce.com/en/promo/orgs/omnistudiotrails
Trailhead:
- OmniScripts module https://trailhead.salesforce.com/en/content/learn/modules/omnistudio-omniscript
- FlexCards module https://trailhead.salesforce.com/en/content/learn/modules/omnistudio-flexcards
- OmniStudio Data Tools and Internal Data module https://trailhead.salesforce.com/en/content/learn/modules/omnistudio-data-tools-and-internal-data